A dust spot in the sky or on a uniformly gray background is usually not the lens’s fault. If you’re looking for how to clean a camera sensor, the most important thing is not speed, but the correct method. The sensor is one of the most sensitive parts of the camera, and improper cleaning can cost more than the cleaning kit itself.
In brief
- Start with a test shot (bright background, closed aperture) to make sure the dirt is really on the sensor.
- Begin with the least invasive method: built-in sensor vibration + air blower, holding the camera with the bayonet facing down.
- Wet cleaning only with a sensor swab of the correct width and a specialized cleaning fluid; do not use improvised materials.
- Do not use compressed air or blow with your mouth — they can leave moisture or propellant residue.
- If you are unsure, the camera is expensive, or the dirt does not disappear after attempts, choose professional service.
What to choose for different tasks
| Task | Solution | Why |
|---|---|---|
| Hobby photographer, sensor with occasional dust spots | Take a test shot, use the built-in cleaning function and an air blower; only then consider wet cleaning. | Lower risk and usually enough if the dirt is loosely attached. The dry approach avoids unnecessary handling of the sensor. |
| Active reportage or travel photographer | Carry a quality air blower and correctly sized sensor swabs with fluid; perform quick checks between sessions. | Fast troubleshooting reduces downtime and lets you continue working without a service visit. |
| Expensive professional camera or recurring contamination problems | At the first signs of recurring contamination or unusual streaks, it is better to go to a professional service. | Reduces the risk of damaging expensive equipment and helps diagnose the cause of contamination, not just the symptoms. |
| A photographer or content team where multiple people use the gear | Implement standard processes: who takes test shots, how cleaning is logged, and when to send it for service. | Procedures reduce the risk that a dirty sensor will be noticed later in editing and ensure consistent quality. |
| Shooting in a dusty or windy outdoor environment | Plan lens changes less often, use lens caps, and change lenses with the body facing down. | Reduces the chance that dust will fall directly onto the sensor, so cleaning will be needed less often. |
Frequently asked questions
When do I really need to clean the sensor?
Clean it if a test shot on a bright, uniform background shows dark spots or streaks that repeat in the same place. To confirm, take a photo with a closed aperture (e.g., f/11–f/22) and low ISO.
Can I use compressed air or blow with my mouth?
No. Compressed air may contain propellant, while blowing with your mouth introduces moisture that can leave marks on the sensor. It is better to use a soft air blower without pressure regulation.
How do I properly wet-clean the sensor?
Use only swabs that match the sensor format and specialized cleaning fluid, adding only a few drops to the swab. Make one smooth, light pass across the sensor from one edge to the other, and use a new or clean side of the swab for the return pass.
How do I know when it is better to go to service?
If the camera is expensive, if the dirt does not come off after several safe methods, or if you see unusual streaks or damage, choose professional service. A service can also help identify the cause of recurring contamination, not just clean the sensor.
How often should I not clean the sensor?
Do not clean the sensor according to the calendar — clean only when needed. Cleaning too often increases the risk of creating new streaks or damaging the surface.
What accessories are minimally needed for safe sensor cleaning?
Minimum kit: a quality air blower, sensor swabs of the correct size, specialized cleaning fluid, a fully charged battery, and a clean workspace without drafts. Always take a test shot before use to evaluate the result.
Useful links
- Power sources - A fully charged battery is required because many camera cleaning modes raise the shutter or mirror — this section helps find power solutions.
- Foto kameras tīrīšana - The category is directly related to products and tips for cleaning the sensor and other camera parts, complementing the article.
- Bags & Cases - Clean, orderly bag compartments and proper storage reduce the risk of dust in the camera and lens bayonet.
- Lens caps - Quality caps help protect the lens and reduce sensor contamination when changing lenses outdoors.
When does a sensor even need cleaning
Sensor cleaning is not a regular maintenance task done on a calendar schedule. It’s done when dust, smudges, or other dirt are visible in the image and repeat in the same place. Most often they’re noticed when shooting at a narrower aperture, such as f/11, f/16, or f/22, especially against a bright, even background.
To make sure the problem is really on the sensor, take a test shot. Choose a white wall, the sky, or a bright monitor background, set a small ISO, close the aperture, and slightly defocus the image. If dark spots repeat in the same places, the sensor likely needs cleaning.
It’s also important to understand that in many cameras the sensor is not directly exposed. There is usually a protective glass or filter layer in front of it. That doesn’t change the fact that the surface must be cleaned very carefully and with suitable tools.
How to clean a camera sensor without unnecessary risk
The safest approach is always to start with the least invasive method. Not every speck of dust means you immediately need a wet clean. In many cases, the camera’s built-in sensor cleaning function and a blower are enough.
Before starting, choose a clean room without drafts or dust. Ideally, there should be no textiles, open windows, or active ventilation. The camera battery should be fully charged, because on some models the shutter opens or the mirror lifts during sensor cleaning mode. If power is interrupted at the wrong moment, the consequences can be unpleasant.
Remove the lens and position the camera with the mount slightly facing down. This helps dust fall out instead of settling deeper inside the body. If the camera has a sensor vibration cleaning function in the menu, start with that. Sometimes that alone solves the problem.
Dry cleaning with a blower
A blower is the first tool worth using. It is safe, simple, and suitable for loose dust. Holding the camera with the opening facing down, blow air toward the sensor area several times without touching internal parts.
There is one important boundary here: do not use compressed air cans, compressors, or any strong air source with uncontrolled pressure. They can blow in condensate, propellant, or simply move dirt in an even worse direction. Also, don’t blow with your mouth. Moisture and tiny droplets are the last thing a sensor needs.
After using the blower, take another test shot. If the spots are gone, that’s enough. If not, the dirt may already be stuck to the surface.
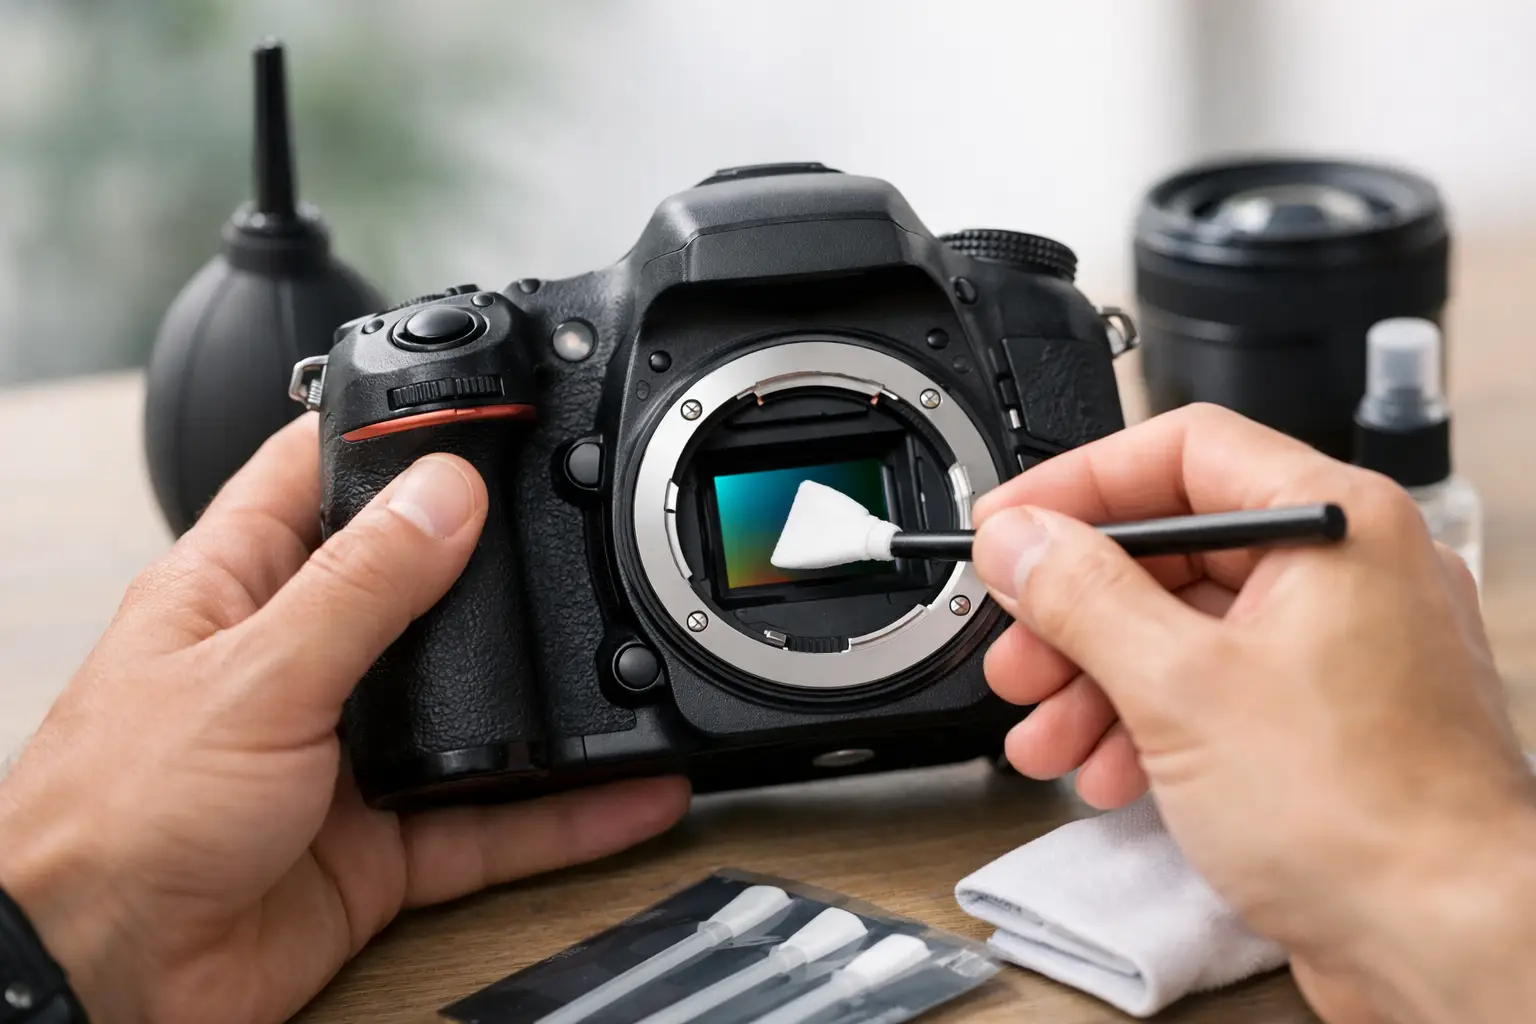
When wet sensor cleaning is needed
If there are oil drops, stuck dust, or streaks on the sensor, the dry method may not help. Then special sensor cleaning swabs and the intended liquid are used. Here it’s important not to improvise. A microfiber cloth, cotton swabs, or a universal cleaning solution are not suitable for this job.
Choose the cleaning swab according to the sensor size — full frame, APS-C, or Micro Four Thirds cameras require the appropriate width. A swab that is too wide or too narrow makes even contact with the surface harder and can leave streaks.
Put only a few drops of cleaning fluid on the swab. The swab should be lightly moistened, not wet. Then, with a smooth, controlled motion, draw it across the sensor surface from one edge to the other. For the second pass, use the clean side of the swab or a new swab. Do not repeatedly rub the same dirty swab.
The main mistake at this stage is too much pressure. The sensor does not need to be pressed. The movement should be firm but light. If you see streaks after the first pass, don’t panic — sometimes that means too much fluid was used or the swab wasn’t clean enough.
The most common mistakes when cleaning a sensor
Most problems come not from the cleaning itself, but from poorly chosen tools. Homemade solutions often cost more in the long run. The sensor surface is not the place for experiments.
Do not use paper towels, eyeglass cloths, cotton fabrics, or household cleaners. They can leave fibers, chemical residues, or micro-scratches. Lens cleaning pens are also not intended for sensors.
Another common mistake is cleaning the sensor too often. If the test shot shows dust only at f/22 and it doesn’t bother you in everyday work, maybe you don’t need to do anything right now. The less often you open the camera and mechanically interact with the sensor area, the lower the risk of creating a new problem.
How to know whether to do it yourself or choose a service center
There is no single right scenario for everyone. If you have experience with equipment, suitable accessories, and a clear understanding of the process, basic sensor cleaning can be done yourself. This is especially useful for active photographers and videographers who often change lenses and can’t afford downtime in the middle of a project.
However, if the camera is new, expensive, professional-grade, or the dirt does not disappear after several attempts, a service center is the wiser choice. The same applies if you see not dust but suspicious streaks, spots, or mechanical damage. Then the problem may be deeper than just a dirty surface.
Professional service is especially valuable if the source of dirt keeps returning. In some cameras, during the initial use period, more mechanical particles or oil traces from the shutter mechanism can appear. If the sensor gets dirty again and again, it makes sense not only to clean it, but also to understand the cause.
How to reduce sensor dirt in everyday use
The best sensor cleaning method is to end up needing wet cleaning less often. It starts with how you change lenses. Change lenses as quickly as possible, turn off the camera before changing them, and keep the body with the mount facing down. This reduces the risk of static attraction and falling dust.
Clean rear lens caps, proper bag compartments, and dirt control on the lens mount itself also help more than many people think. Dust often gets onto the sensor not from the outside world in dramatic conditions, but from the equipment itself, stored for a long time in a neglected environment.
If you shoot outdoors, especially in wind, sand, or industrial environments, planning lens changes becomes even more important. Sometimes it is better to bring a second body or know in advance which focal length will be needed in a given situation. This is not just a matter of convenience, but also of sensor hygiene.
How to clean a camera sensor for different users
For a hobby user, it is usually enough to know how to recognize sensor dirt, how to use the built-in cleaning function, and when to safely use a blower. If wet cleaning becomes necessary, it is often wiser to consult a specialist first rather than learn at the expense of your main camera.
For an experienced photographer or videographer, a sensor cleaning kit can be as logical a bag item as a spare battery. Especially if work takes place in reportage, travel, or rental gear circulation, where time is a critical factor. In such cases, not only the accessories matter, but also a consistent, disciplined method.
For content teams and companies that use equipment among multiple people, it’s worth establishing a simple routine — who checks the sensor, how test shots are made, and when the camera is sent for professional cleaning. This reduces the risk that a dirty sensor is only noticed during editing or after a big shoot.
What to prepare before cleaning the sensor
If you plan to clean the sensor yourself, the minimum kit is a quality blower, the appropriate size sensor swabs, and specialized cleaning fluid. A clean work surface, a fully charged battery, and the ability to immediately check the result on a larger screen are also useful.
The key is not to buy as many accessories as possible, but to choose the right ones. Cheap and poor-quality sensor cleaning kits can create more streaks than solutions. If you have doubts about compatibility with your camera system or sensor format, it’s better to clarify that before the first cleaning.
For Master Foto customers, this is a typical question where precise advice is often more valuable than a universal tip. In sensor cleaning, the details really determine the result.
If you’re not sure, start with the safest scenario — test shot, built-in cleaning, blower, and only then the next steps. A camera sensor does not require courage. It requires a steady hand and the right decision at the right time.